Goosky S2 Ultra
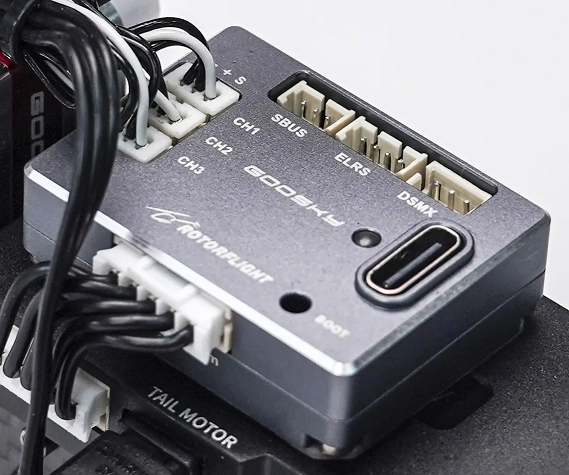
Goosky F4-mini Flight Controller
- MCU: STM32F405
- IMU: ICM-42688-P
- Blackbox: 128 MB W25N01G
- Three UARTs: UART1 (ELRS/DSMX), UART2 (SBUS), UART5 (ESC Telemetry)
- Three servo ports (micro JST 1.25mm, Molex PicoBlade compatible)
- Dedicated 3-pin SBUS port and 4-pin ELRS port (1.25mm micro JST)
- DSMX port (3-pin JST-ZH)
- ESC connector for 7.4V, telemetry, main and tail motor (5-pin JST-PH)
- USB-C for configuration
- Dimensions: 24 x 33 x 9 mm
- Weight: 12 g
Goosky 3S F421 2-in-1 ESC
- MCUs: two AT32F421
- Dshot RPM telemetry for both main and tail motors
- BLHeli32/KISS telemetry providing real-time voltage, current, and temperature data
- Official AM32 target support
Rotorflight Target
Please use the GOOSKY_F4MINI target when updating Rotorflight firmware.

Update Procedure for the S2 Ultra
This is the official Rotorflight tune for the Goosky S2 Ultra. The S2 Ultra and S2 Max use different tunes—select the correct one for your model. This tune requires updated AM32 ESC firmware, so update your ESC before applying.
1. Update the F4-mini Firmware
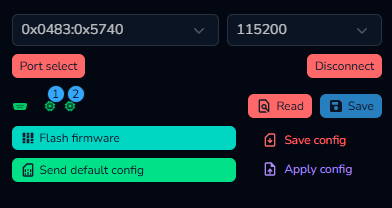
- Start Rotorflight Configurator
- Connect the F4-mini using USB
- Click on Update Firmware in the upper right corner
- Select the GOOSKY_F4MINI board in the dropdown
- Select firmware version 25-07-2025 08:39 - 4.5.1
- Enable Full chip erase
- Click Load Firmware [Online]
- Click Flash Firmware
- Wait till it finished flashing. If everything went well, it should display Programming SUCCESSFUL.
Now that the firmware has been updated, you can configure it.
Windows needs the right drivers for flashing Rotorflight. If you haven't flashed Rotorflight before or if the above procedure fails, refer to the instructions under Flashing the Firmware.
2. Configure the F4-mini for the S2 Ultra
The Rotorflight team has created a tune for the S2 Ultra. It's available as a diff and as a dump. RPMs for profile 1/2/3: 4400/5100/5500.
- S2 Ultra configuration diff
- S2 Ultra configuration dump
Do not use these configurations if you haven't flashed the F4-mini as described above. The configuration expects certain default values which are only available after flashing the GOOSKY_F4MINI board.
Download the configuration you want (e.g. right click on it and select Save link as). Then proceed as follows:
- Click on Connect in the upper right corner of the Rotorflight Configurator
- Click on CLI tab, then on Load file
- Select the configuration you just downloaded
- Click on Execute
- After the configuration has been loaded, a warning will be given: 'The accelerometer is enabled but is not calibrated'. Click Close.
- Go to the Setup tab and click on Calibrate Accelerometer
- Go to the Servos tab and adjust servo centers.
- Go to the Mixer tab and check the Collective trim
- On the Rates tab, configure the rates to your liking.
- On the Modes tab, configure the modes so that they work with your transmitter.
- On the Adjustments tab, configure the adjustments so that they work with your transmitter.
3. Update the ESC Firmware
Follow this update procedure carefully and completely. A failed flash can brick the ESC, which would then require special tools to restore.
- Download AM32_GOOSKY_3S_F421_2.19.hex
- Power up the S2 Ultra
- Connect the F4-mini using USB
- Make sure Rotorflight Configurator isn't connected to the F4-mini. If it is, press Disconnect.
- Go to https://am32.ca/configurator
- Click on Connect in the upper right corner
- Click on Read. The AM32 Configurator will now show various ESC settings, as well as some new buttons.
- Click Flash firmware
- Go to the Local tab
- Select Ignore current mcu layout if you flash the ESC for the first time
- Click Choose file and select the
AM32_GOOSKY_3S_F421_2.19.hexfile you downloaded - Click Start flash and wait till it's done
4. Configure the ESCs
After both ESCs have been flashed, they can be configured. ESC 1 is the ESC for the main motor, while ESC 2 is for the tail motor. The ESCs have slightly different settings. For example, the main motor ESC is configured so that it won't brake on spool down, while the tail ESC uses complementary PWM for braking.
Start with configuring the main motor ESC.
- Download
s2-ultra-main-esc-config.bin - Click on Apply config
- Click Choose file and select the file
S2-ultra-main-esc-config.binthat you just downloaded - Only select ESC 1
- Click Apply
Now configure the tail ESC.
- Download
s2-ultra-tail-esc-config.bin - Click on Apply config
- Click Choose file and select the file
S2-ultra-tail-esc-config.bin - Only select ESC 2
- Click Apply
- Click Disconnect
- Power down the S2
That's it! Now check and test everything carefully and go fly your S2. It's a seriously fun machine!
The AM32 Configurator will only show the settings for ESC 1 under Motors, even if only ESC 2 is selected. That's a bug and means that you can't properly configure ESC 2 using the AM32 Configurator UI.
If you're using Windows, you can use the AM32 Config Tool v1.93 for configuring both ESCs.
If you don't use Windows, you can configure Rotorflight so that it only exposes the tail ESC. In Rotorflight Configurator, go to the CLI tab and type:
resource MOTOR 1 A08
resource MOTOR 2 NONE
save
Now you can configure the tail ESC in AM32 Configurator. When you're done, restore the original settings with:
resource MOTOR 1 C08   # main motor
resource MOTOR 2 A08   # tail motor
save